How to set up velocity profile for dynamixel motor

I don’t know where to post this. So maybe here. Sorry if it’s not the right place, and please point me to where I can ask this kind of question.

So, anyway, I’m trying to learn to control dynamixel motr. And I know we can use velocity and acceleration profile to create trapezoidal profile. The infomation I get from the manual website of dynamixel. XM430-W350-T/R

  1. Which value should I set for velocity profile? For example I read in the datasheet that at 12V the velocity is 30 rev/min. As I understand that I should set the value of velocity profile to 132 (30 divided to 0.229 rev/min = 132). Is that correct?
  2. What about the acceleration profile? I see nothing mention in the datasheet so I don’t know what is the max acceleration for the motor. The datasheet say that, acceleration profile value will not exceed 50% of velocity. Does that mean I should set the acceleration value to 61 (50% of 132)?
  3. Time calculation for trapezoidal profile is t1 = 64 * (Velocity profile/Acceleration profile), t2 = 64 * delta_position / Velocity profile. What is the units and values using in here? Is that the real velocity value (30 rev/min) or the integer value set before(132). If so, wouldn’t t1 value would be in minute? same with acceleration? What about delta_position is that in integer value or rev value?

Thank you for your help.

Hi,

First of all, if you want to use Profiles, you need to set Profile Velocity(112) to a non-zero value because setting Profile Velocity to 0 mean Profile not used .

I’ll assume that you have XH430-W350(30 RPM @ 12V).

Please note that 30RPM is no load speed where the DYNAMIXEL gives the maximum RPM, therefore, even if you enter any Velocity value that exceeds this no load speed will not effective due to the hardware limitation.

Below is what I would do to make a Trapezoidal Profile with XH430-W350.

  1. Set Profile Velocity(112) to 130 (which is almost max RPM)

  2. Set Profile Acceleration(108) to 30

  3. Adjust Profile Acceleration by step of 10 to create desired speed.

In each Profile Acceleration(108) and Profile Velocity(112), there are tables for Time-based Profile.

This table is intended to help creating time based motion.

For example, if you want to create a motion that goes from position 0 to 4095 in 5.5 seconds, you have to set the Drive Mode(10) Bit 2 to 1, so that DYNAMIXEL uses Time-based Profile control.

Then, set Profile Velocity(112) to 5500 so that the whole motion takes 5.5 seconds to complete.

If you need to adjust accelerating / decelerating time, you can set Profile Acceleration(108) to any value you want, but the value cannot exceed 50% of the Profile Velocity(112) or else it’ll create a triangle profile.

t1 = 64 * (Velocity profile/Acceleration profile), t2 = 64 * delta_position / Velocity profile is only applied in Velocity-based time calculation.

In case of Time-based profile, t1(Acceleration time) = Profile Acceleration(108) and t3(Total time) = Profile Velocity(112) are applied.

Thank you.

Thank you very much for taking time to answer my question! I appreciate it! Just one more thing, so in Velocity-based time calculation, the time unit for t1 and t2 is miliseconds right? I assume it because in time-based profile, t1 and t3 is the same as Profile Velocity so it must be in ms?

Hi,

In case of Velocity-based profile, t1 and t2 are in minutes.
In the equation t1 = (64 * Profile Velocity) / Profile Acceleration, the unit of Profile Velocity is in rev/min while Profile Acceleration is in rev/min2.
Therefore, each rev and min in the numerator and denominator will get canceled to leave the min-1 in the denominator.

Thank you.

Then I don’t understand why the number 64 is there. Shouldn’t it be t = delta V/a, in case the starting velocity is 0 then just t = v/a. Where does the number 64 come from?

I’m not sure if I correctly understood what you meant, but the t1 equation helps us to estimate the expected time for acceleration based on the constant parameters we set for Profile Velocity and Profile Acceleration.
The Velocity may vary during the operation, but not the Profile Velocity nor the Profile Acceleration.
64 is just a constant that is introduced to get more precise time with the equation.
Thank you.

Hi,

I’m using Dynamixel MX-64 motors in ROS and still don’t know how to switch the drive mode to velocity-based profile in order to have a trapezoidal velocity profile. Drive mode 
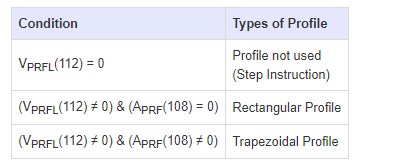
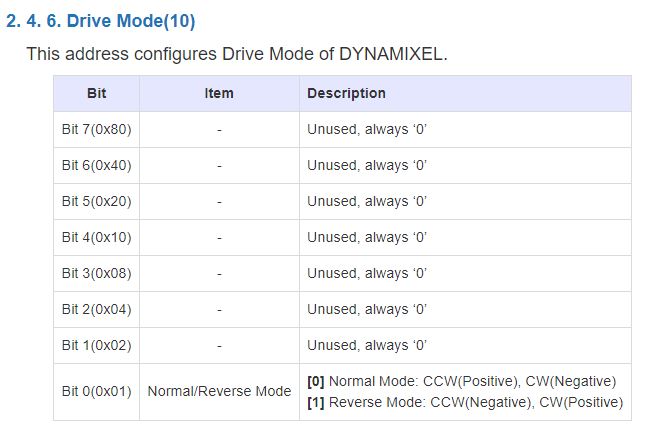
as shown here Bit 2 is unused. The Vpfrl and Aprf in the yaml file are not equal to 0. How can I switch the drive mode to velocity-based profile?

This is my yaml file of 1 motor
yaw:
controller:
package: dynamixel_controllers
module: joint_position_controller
type: JointPositionController
joint_name: joint_1
motor:
id: 1
init: 2047
min: 0
max: 4095
Operating_Mode: 3
Drive_Mode: 0
Profile_Acceleration: 30
Profile_Velocity: 130

Thanks for your help

First of all, MX-64T must be recovered with protocol 2.0 firmware using DYNAMIXEL Wizard 2.0 or R+Manager 2.0.

For the operating modes, MX-64T 2.0 supports 6 different operating modes and it is basically running on Velocity based profiles.

Setting both Profile Acceleration and Profile Velocity to 0 will use their maximum value, so if you want to use trapezoidal profile, you should set them with smaller values.

Thank you.

Hi,

I just wanted to be sure but would using velocity control profile in C++ be just like the example Read-Write Protocol 2.0 example.

this part specificially but instead of goal position, a goal velocity?

    // Write goal position
    dxl_comm_result = packetHandler->write4ByteTxRx(portHandler, DXL_ID, ADDR_PRO_GOAL_POSITION, dxl_goal_position[index], &dxl_error);
    if (dxl_comm_result != COMM_SUCCESS)
    {
      packetHandler->printTxRxResult(dxl_comm_result);
    }
    else if (dxl_error != 0)
    {
      packetHandler->printRxPacketError(dxl_error);
    }

    do
    {
      // Read present position
      dxl_comm_result = packetHandler->read4ByteTxRx(portHandler, DXL_ID, ADDR_PRO_PRESENT_POSITION, (uint32_t*)&dxl_present_position, &dxl_error);
      if (dxl_comm_result != COMM_SUCCESS)
      {
        packetHandler->printTxRxResult(dxl_comm_result);
      }
      else if (dxl_error != 0)
      {
        packetHandler->printRxPacketError(dxl_error);
      }

      printf("[ID:%03d] GoalPos:%03d  PresPos:%03d\n", DXL_ID, dxl_goal_position[index], dxl_present_position);

    }while((abs(dxl_goal_position[index] - dxl_present_position) > DXL_MOVING_STATUS_THRESHOLD));

Based on assumption that you are using X series DYNAMIXEL, in order to use Velocity Control Mode, the Operating Mode(11) should be set to 1 which enables operating DYNAMIXEL using Goal Velocity(104).

If you are referring to the read_write example, you should append below code before the // Enable Dynamixel Torque section so that your DYNAMIXEL is correctly set to Velocity Control mode.

dxl_comm_result = packetHandler->write1ByteTxRx(portHandler, DXL_ID, 11, 1, &dxl_error);

if (dxl_comm_result != COMM_SUCCESS) {
  printf("%s\n", packetHandler->getTxRxResult(dxl_comm_result));
}
else if (dxl_error != 0) {
  printf("%s\n", packetHandler->getRxPacketError(dxl_error));
}
else {
  printf("DYNAMIXEL has been successfully set to Velocity Control Mode.\n");
}

Then, later in the code where it writes a value to the Goal Position, you will need to replace the address of Goal Position(116) to Goal Velocity(104) as below.
Be aware that you’ll also need to modify the do-while loop logic properly.

#define ADDR_GOAL_VELOCITY 104
...
int dxl_goal_velocity = VELOCITY_VALUE;
...
dxl_comm_result = packetHandler->write4ByteTxRx(portHandler, DXL_ID, ADDR_GOAL_VELOCITY, VELOCITY_VALUE, &dxl_error);