Using VIN Pin on Dynamixel MKR Shield

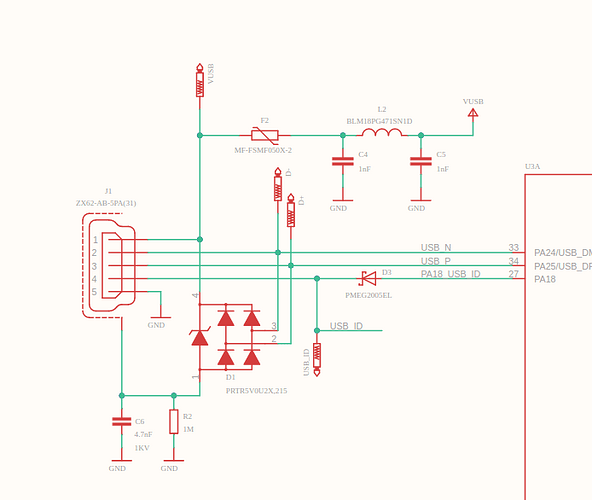
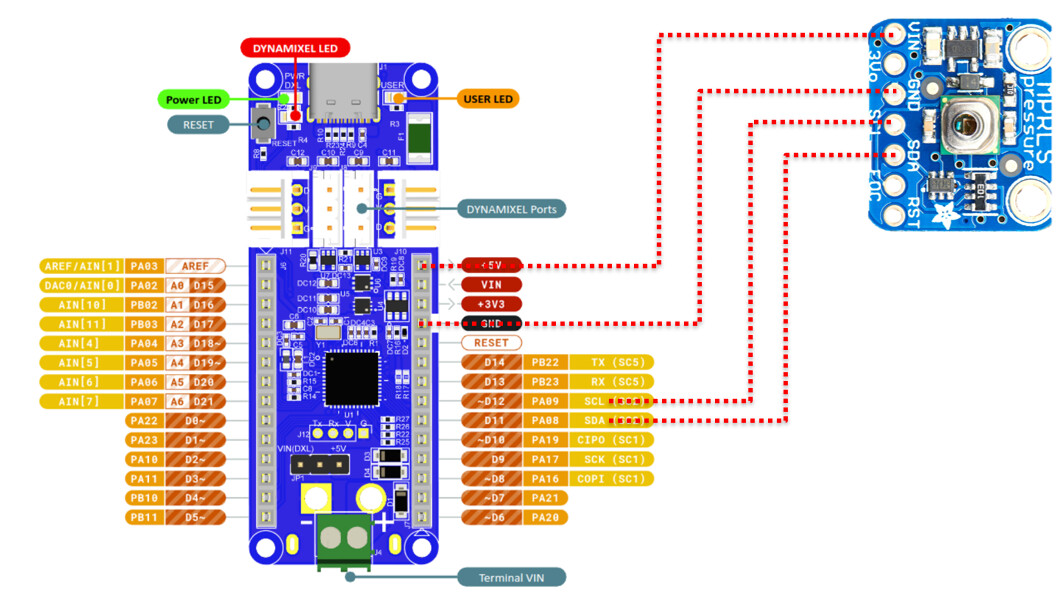
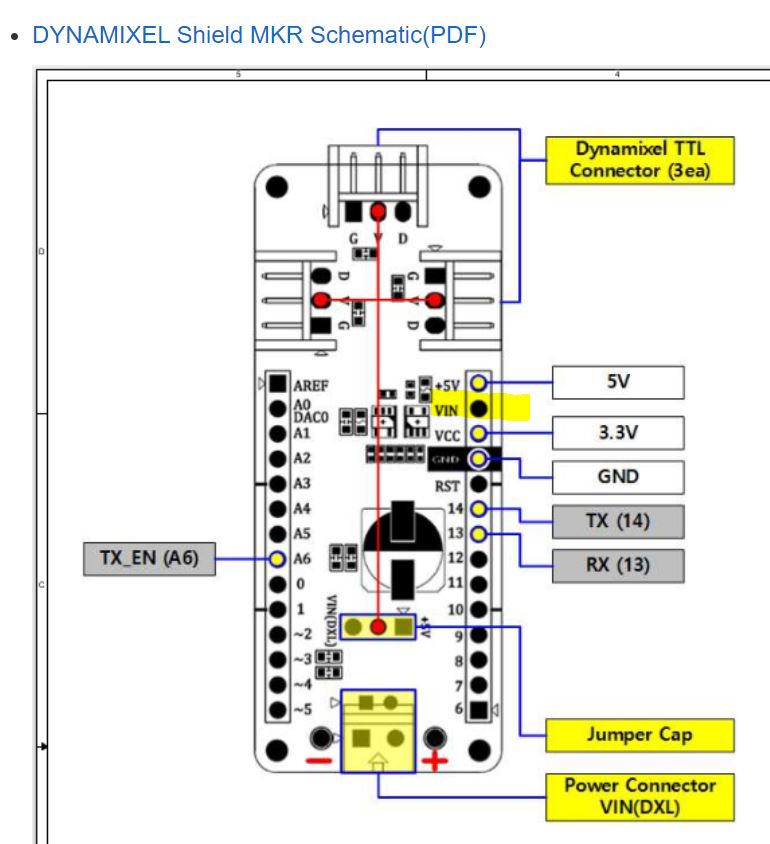
This is a screen capture of the DXL MKR Shield from the ROBOTIS e-Manual

I am using a MKR ZERO, and one of the Power Option for it, is to use a REGULATED 5V Power Supply going into this VIN Pin (from Arduino web site). And the MKR Zero is connected to the bottom of the DXL MKR Shield in my case. Also I am going to use only XL-330s.

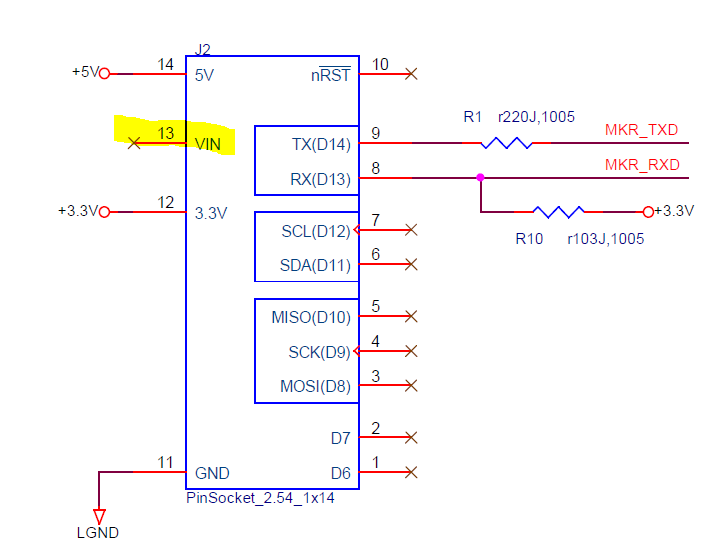
Furthermore, on the ROBOTIS Schematic for DXL MKR Shield, it seems on the Shield, this VIN Pin is not connected to anything - i.e., it is just passing through to MKR ZERO (?) - Am I correct here?

So, my final question (for ROBOTIS Tech Support folks) is that if I use the VIN pin and put 5V regulated to it, and also put the Jumper Cap onto the 5 V Position, I should be able to power the DXL MKR Shield and the MKR ZERO at the same time (and using only XL-330s of course)?

Has anyone in the community using the MKR series and DXL MKR Shield this way yet?

Thank you very much in advance.

1 Like

I did try this option out and it worked fine, the 5V VIN did extend to the DXL Shield OK. But now that the MicroUSB Port is “freed up”, my intention was to see if I can hook up a U2D2 to it now, using an OTG cable (and eventually put a BT-410 on it). But Alas! If VIN is used, it looks like that the USB Port is not subsequently powered. Better buy MKR WiFi 1010, I guess!

2 Likes

Well… As you already verified that USB port on MKR zero can not power the U2D2 through the VUSB (One Way only), you might need another board which support multiple serial ports or WIFI shield interacting with BT-410 as wireless mode.

Fortunately, OpenRB-150 benefits the extra ports, and therefore you do not have to trick :slight_smile:

Thanks,

Hope the OpenRB-150 soon to be released.

2 Likes

Hi, I am using both RC100 and a pressure sensor on the OpenRB150 board. Either of them can work well. However, when I wanted to use the RC100 to control sensor data reading, it always failed. I realized this is an issue related to the serial port configuration.
Just wondering in this case, how can I configure the serial port?
The sensor is configured using Serial.begin(115200);
The RC100 is configured using Controller.begin(2);

What do you mean by controlling the pressure sensor with RC-100? The RC-100 has its own packet protocol and the pressure sensor has its communication protocol probably, so you need some translating code In between.

I don’t know what problems do you have between rc100 and your pressure sensor but you can always move your rc100 BT module to Serial 4 or 5. That is already shown in the book. Also ROBOTIS restricts all their BT comm. to 57.6 Kbps.

Also your post shows that you are using “Serial()” for the Pressure Sensor? Do you know that Serial() points to the USB port of the RB-150? This bounds to be an error of some sort! Which GPIO pins are your pressure sensor hooked up to?

Thanks for your reply. I will try to describe my question clearly.

// You dont need a reset and EOC pin for most uses, so we set to -1 and don’t connect
#define RESET_PIN -1 // set to any GPIO pin # to hard-reset on begin()
#define EOC_PIN -1 // set to any GPIO pin to read end-of-conversion by pin
Adafruit_MPRLS mpr = Adafruit_MPRLS(RESET_PIN, EOC_PIN);

void setup() {
** Serial.begin(115200);**
** Serial.println(“MPRLS Simple Test”);**
** if (! mpr.begin()) {**
** Serial.println(“Failed to communicate with MPRLS sensor, check wiring?”);**
** while (1) {**
** delay(10);**
** }**
** }**
** Serial.println(“Found MPRLS sensor”);**
}

void loop() {
** float pressure_hPa = mpr.readPressure();**
** Serial.print("Pressure (KPa): "); Serial.println(pressure_hPa/10);**
** delay(100);**
}

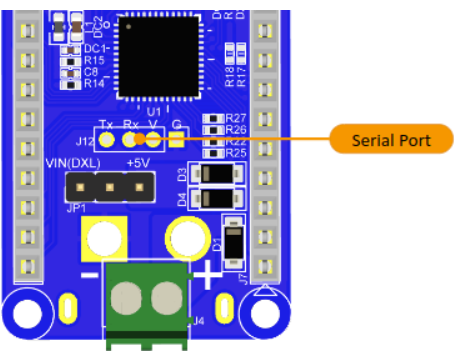
  • List item The BT module is connected via the Serial Port on OpenRB150 that is assigned to Serial2
    image

  • List item The code for BT communication is:
    **#include <RC100.h> **
    RC100 Controller;
    uint16_t RcvData = 0;

#include <Dynamixel2Arduino.h>
// Please modify it to suit your hardware.
#if defined(ARDUINO_AVR_UNO) || defined(ARDUINO_AVR_MEGA2560) // When using DynamixelShield
** #include <SoftwareSerial.h>**
** SoftwareSerial soft_serial(7, 8); // DYNAMIXELShield UART RX/TX**
** #define DXL_SERIAL Serial**
** #define DEBUG_SERIAL soft_serial**
** const int DXL_DIR_PIN = 2; // DYNAMIXEL Shield DIR PIN**
#elif defined(ARDUINO_OpenRB) // When using OpenRB-150
** //OpenRB does not require the DIR control pin.**
** #define DXL_SERIAL Serial1**
** #define DEBUG_SERIAL Serial**
// const int DXL_DIR_PIN = -1;
** const int DXL_DIR_PIN = 5;**
#else // Other boards when using DynamixelShield
** #define DXL_SERIAL Serial1**
** #define DEBUG_SERIAL Serial**
** const int DXL_DIR_PIN = 2; // DYNAMIXEL Shield DIR PIN**
#endif

Dynamixel2Arduino dxl(DXL_SERIAL, DXL_DIR_PIN);
using namespace ControlTableItem;
const float DXL_PROTOCOL_VERSION = 2.0;

const uint8_t gr_ID = 1;
const uint8_t rt_ID = 2;
const uint8_t df_ID = 3;
const uint8_t fd_ID = 4;

void setup(){
** // Use Serial to debug.**
** DEBUG_SERIAL.begin(115200);**
** // Set Port baudrate to 57600bps. This has to match with DYNAMIXEL baudrate.**
** dxl.begin(57600);**
** dxl.setPortProtocolVersion(DXL_PROTOCOL_VERSION);**
** // Get DYNAMIXEL information**
** dxl.ping(gr_ID);**
** dxl.ping(rt_ID);**
** dxl.ping(df_ID);**
** dxl.ping(fd_ID); **
** // Turn off torque when configuring items in EEPROM area, set PWM mode**
** dxl.torqueOff(gr_ID);**
** dxl.setOperatingMode(gr_ID, OP_EXTENDED_POSITION);**
** dxl.torqueOn(gr_ID);**
** dxl.writeControlTableItem(PROFILE_VELOCITY, gr_ID, 50);**
** dxl.torqueOff(rt_ID);**
** dxl.setOperatingMode(rt_ID, OP_POSITION);//limit rotation angle**
** dxl.torqueOn(rt_ID);**
** dxl.writeControlTableItem(PROFILE_VELOCITY, rt_ID, 50);**
** dxl.torqueOff(df_ID);**
** dxl.setOperatingMode(df_ID, OP_EXTENDED_POSITION);**
** dxl.torqueOn(df_ID);**
** dxl.writeControlTableItem(PROFILE_VELOCITY, df_ID, 50);**
** dxl.torqueOff(fd_ID);**
** dxl.setOperatingMode(fd_ID, OP_EXTENDED_POSITION);**
** dxl.torqueOn(fd_ID);**
** dxl.writeControlTableItem(PROFILE_VELOCITY, fd_ID, 50);**


** Serial.begin(57600);**
** Controller.begin(2); **
}

void loop(){
** RcvData = 0;**
** if (Controller.available()){**
** RcvData = Controller.readData();**
** }**

** if(RcvData == (RC100_BTN_L)){ **
** Serial.print(“L”); **
** }**

** if(RcvData == (RC100_BTN_R)){ **
** Serial.print(“R”); **
** }**

** if(RcvData == (RC100_BTN_1)){**
** Serial.print(“1”); **
** }**

** if(RcvData == (RC100_BTN_3)){**
** Serial.print(“3”); **
** }**

** if(RcvData == (RC100_BTN_2)){**
** Serial.print(“2”); **
** }**

** if(RcvData == (RC100_BTN_4)){**
** Serial.print(“4”); **
** } **
}

  • List item Either of the above code works well. The issue should related to multiple Serial port configuration

Just wondering in this case, how should I configure the serial port in the setup() section to make both of them work simultaneously?

I already pointed out your problem in the other post that you made

You need to review Section 2.4 of the free KINDLE sample of my Arduino book

In summary:

  1. Your Pressure device is an I2C device, so just follow the Adafruit instructions. This device got nothing to do with the BT UART Port Serial2(), nor with the DXL Port Serial1(), nor with the Serial Monitor tool Serial() (i.e. the USB Port of the OpenRB-150).

  2. To set up the Serial Monitor tool (i.e. Serial()), use either Serial.begin(57600) or Serial.begin(115200) and DO NOT FLIP-FLOP the baud rate for Serial() within your sketch.

  3. To set up the RC100 protocol onto Serial2(), use the following statements:
    #include <RC100.h>
    RC100 Controller;
    Controller.begin(2); // meaning that you want Serial2() to act as an RC100 device.
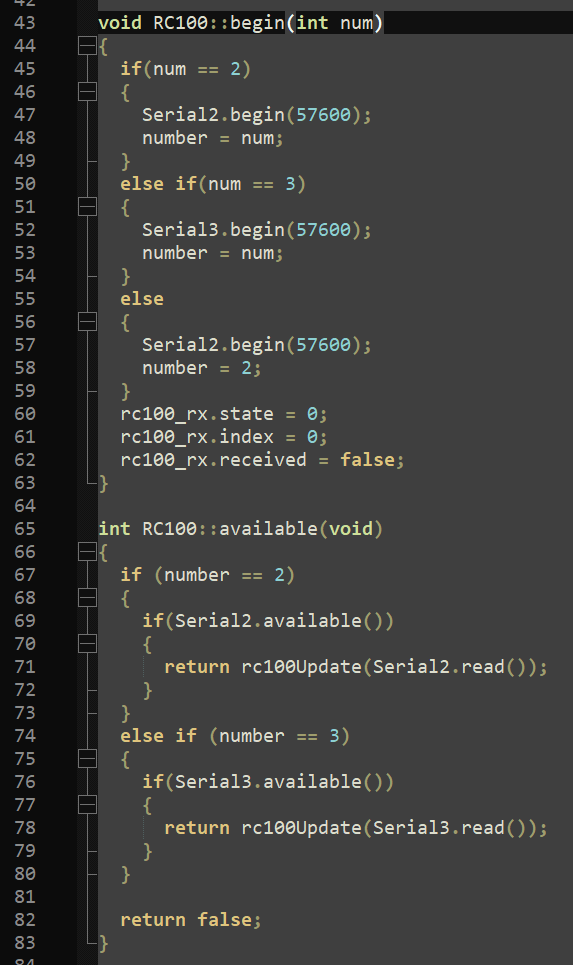
    Also as all ROBOTIS BT-210/410 modules are set to 57600, so all RC100 devices are also set at 57600, meaning that your sketch does not need to set up baud rate for Serial2() - see the file RC100.cpp and you can see the actual code for Function RC100::begin() - please see Fig. 2.7 in the Kindle sample or enclosed picture below:

image

Please check your own RC100.cpp to see the code is the same or not.

  1. To use the DXL Port (i.e. Serial1()) for the OpenRB-150, the setup should be as follows:
    #include <Dynamixel2Arduino.h>
    #define DXL_SERIAL Serial1
    const int DXL_DIR_PIN = -1;
    Dynamixel2Arduino dxl(DXL_SERIAL, DXL_DIR_PIN);
    dxl.begin(1000000); // as ROBOTIS actuators are usually set for 1 Mbps.

You need to keep track of which Serial Port you are using and for which purpose, if not you won’t go very far with Arduino.

@Zicong

If I was doing your project, I would organize my code as follows:

// Adafruit section
#include <Wire.h>
#include "Adafruit_MPRLS.h"
#define RESET_PIN  -1  // set to any GPIO pin # to hard-reset on begin()
#define EOC_PIN    -1  // set to any GPIO pin to read end-of-conversion by pin
Adafruit_MPRLS mpr = Adafruit_MPRLS(RESET_PIN, EOC_PIN);

// ROBOTIS section
#include <RC100.h>
#include <Dynamixel2Arduino.h>
#define DXL_SERIAL Serial1
const int DXL_DIR_PIN = -1;
RC100 Controller;  // Instantiation of Remote Controller and Output Monitor - later via Serial2
uint16_t RcvData = 0;
Dynamixel2Arduino dxl(DXL_SERIAL, DXL_DIR_PIN);  
using namespace ControlTableItem;
const float DXL_PROTOCOL_VERSION = 2.0;
const uint8_t gr_ID = 1;
const uint8_t rt_ID = 2;
const uint8_t df_ID = 3;
const uint8_t fd_ID = 4;

void setup() {
// Adafruit section
  Serial.begin(115200);  // Serial Monitor
  Serial.println("MPRLS Simple Test");
  if (! mpr.begin()) {
    Serial.println("Failed to communicate with MPRLS sensor, check wiring?");
    while (1) {
      delay(10);
    }
  }
  Serial.println("Found MPRLS sensor");

// ROBOTIS section
  Controller.begin(2);  // RC100 Controller using Serial2 BT-210 connected to TASK OUTPUT MONITOR on PC
  dxl.begin(1000000);
  dxl.setPortProtocolVersion(DXL_PROTOCOL_VERSION);
  
  dxl.torqueOff(gr_ID);
  dxl.setOperatingMode(gr_ID, OP_EXTENDED_POSITION);
  dxl.torqueOn(gr_ID);
  dxl.writeControlTableItem(PROFILE_VELOCITY, gr_ID, 50);
  
  dxl.torqueOff(rt_ID);
  dxl.setOperatingMode(rt_ID, OP_POSITION);
  dxl.torqueOn(rt_ID);
  dxl.writeControlTableItem(PROFILE_VELOCITY, rt_ID, 50);
  
  dxl.torqueOff(df_ID);
  dxl.setOperatingMode(df_ID, OP_EXTENDED_POSITION);
  dxl.torqueOn(df_ID);
  dxl.writeControlTableItem(PROFILE_VELOCITY, df_ID, 50);
  
  dxl.torqueOff(fd_ID);
  dxl.setOperatingMode(fd_ID, OP_EXTENDED_POSITION);
  dxl.torqueOn(fd_ID);
  dxl.writeControlTableItem(PROFILE_VELOCITY, fd_ID, 50);
  
}  // end of setup()


void loop() {
// MPRLS section
  float pressure_hPa = mpr.readPressure();
  Serial.print("Pressure (hPa): "); Serial.println(pressure_hPa);
  Serial.print("Pressure (PSI): "); Serial.println(pressure_hPa / 68.947572932);
  delay(1000);

//RC-100 section
  RcvData = 0;
  if (Controller.available()) 
  {
    RcvData = Controller.readData();
    if (RcvData == 0)
    {
       Serial2.println("All Buttons Released");  // print on TASK's Output Monitor
       Serial.println("All Buttons Released via Serial2");
    }
    if ((RcvData & RC100_BTN_U) > 0)
    {
       Serial2.println("Button UP pushed");  // print on TASK's Output Monitor
       Serial.println("Button UP pushed via Serial2");
    }
// etc.. for the other buttons as needed
  }

}  // end of loop

I know that this sketch compiles OK for me, but I do not have the MPLRS sensor so I can’t test it with 100% certainty. My code also assumes that a BT-210 is connected to Serial2 Port on the OpenRB-150, and on the PC side, I would use TASK2 Output Monitor tool to send my UDLR commands from the PC to the OpenRB-150 via this BT-210.

1 Like

Hi @roboteer Many thanks for your clear explanation of the serial port configuration. It entirely solved my confusion on this. I also modified my code as you suggested. However, I still have this issue.

My code is like below:
//Adafruit section
#include <Wire.h>
#include “Adafruit_MPRLS.h”
#define RESET_PIN -1 // set to any GPIO pin # to hard-reset on begin()
#define EOC_PIN -1 // set to any GPIO pin to read end-of-conversion by pin
Adafruit_MPRLS mpr = Adafruit_MPRLS(RESET_PIN, EOC_PIN);

#include <RC100.h>
RC100 Controller;
uint16_t RcvData = 0;

#include <Dynamixel2Arduino.h>
// Please modify it to suit your hardware.
#if defined(ARDUINO_AVR_UNO) || defined(ARDUINO_AVR_MEGA2560) // When using DynamixelShield
#include <SoftwareSerial.h>
SoftwareSerial soft_serial(7, 8); // DYNAMIXELShield UART RX/TX
#define DXL_SERIAL Serial
#define DEBUG_SERIAL soft_serial
const int DXL_DIR_PIN = 2; // DYNAMIXEL Shield DIR PIN
#elif defined(ARDUINO_OpenRB) // When using OpenRB-150
//OpenRB does not require the DIR control pin.
#define DXL_SERIAL Serial1
#define DEBUG_SERIAL Serial
// const int DXL_DIR_PIN = -1;
const int DXL_DIR_PIN = 5;
#else // Other boards when using DynamixelShield
#define DXL_SERIAL Serial1
#define DEBUG_SERIAL Serial
const int DXL_DIR_PIN = 2; // DYNAMIXEL Shield DIR PIN
#endif

Dynamixel2Arduino dxl(DXL_SERIAL, DXL_DIR_PIN);
using namespace ControlTableItem;
const float DXL_PROTOCOL_VERSION = 2.0;

const uint8_t gr_ID = 1;
const uint8_t rt_ID = 2;
const uint8_t df_ID = 3;
const uint8_t fd_ID = 4;

double gr_CP, gr_DP, gr_initial, rt_CP, rt_DP, rt_initial, df_CP, df_DP, df_initial, fd_CP, fd_DP, fd_initial;

void setup(){

//Adafruit section
Serial.begin(115200);
Serial.println(“MPRLS Simple Test”);
if (! mpr.begin()) {
Serial.println(“Failed to communicate with MPRLS sensor, check wiring?”);
while (1) {
delay(10);
}
}
Serial.println(“Found MPRLS sensor”);

Controller.begin(2);
// Set Port baudrate to 57600bps. This has to match with DYNAMIXEL baudrate.
dxl.begin(57600);
dxl.setPortProtocolVersion(DXL_PROTOCOL_VERSION);
// Get DYNAMIXEL information
dxl.ping(gr_ID);
dxl.ping(rt_ID);
dxl.ping(df_ID);
dxl.ping(fd_ID);
// Turn off torque when configuring items in EEPROM area, set PWM mode
dxl.torqueOff(gr_ID);
dxl.setOperatingMode(gr_ID, OP_EXTENDED_POSITION);
dxl.torqueOn(gr_ID);
dxl.writeControlTableItem(PROFILE_VELOCITY, gr_ID, 50);
dxl.torqueOff(rt_ID);
dxl.setOperatingMode(rt_ID, OP_POSITION);//limit rotation angle
dxl.torqueOn(rt_ID);
dxl.writeControlTableItem(PROFILE_VELOCITY, rt_ID, 50);
dxl.torqueOff(df_ID);
dxl.setOperatingMode(df_ID, OP_EXTENDED_POSITION);
dxl.torqueOn(df_ID);
dxl.writeControlTableItem(PROFILE_VELOCITY, df_ID, 50);
dxl.torqueOff(fd_ID);
dxl.setOperatingMode(fd_ID, OP_EXTENDED_POSITION);
dxl.torqueOn(fd_ID);
dxl.writeControlTableItem(PROFILE_VELOCITY, fd_ID, 50);
}

void loop(){
// MPRLS section
float pressure_hPa = mpr.readPressure();
Serial.print("Pressure (hPa): "); Serial.println(pressure_hPa/10);
delay(50);

RcvData = 0;
if (Controller.available()){
RcvData = Controller.readData();
}

if(RcvData == (RC100_BTN_L)){
gr_CP = dxl.getPresentPosition(gr_ID, UNIT_DEGREE);
gr_DP = gr_CP + 5;
dxl.setGoalPosition(gr_ID, gr_DP, UNIT_DEGREE);
}

if(RcvData == (RC100_BTN_R)){
gr_CP = dxl.getPresentPosition(gr_ID, UNIT_DEGREE);
gr_DP = gr_CP - 5;
dxl.setGoalPosition(gr_ID, gr_DP, UNIT_DEGREE);
}

if(RcvData == (RC100_BTN_1)){
df_CP = dxl.getPresentPosition(df_ID, UNIT_DEGREE);
df_DP = df_CP + 5;
dxl.setGoalPosition(df_ID, df_DP, UNIT_DEGREE);
}

if(RcvData == (RC100_BTN_3)){
df_CP = dxl.getPresentPosition(df_ID, UNIT_DEGREE);
df_DP = df_CP - 5;
dxl.setGoalPosition(df_ID, df_DP, UNIT_DEGREE);
}
}

The baud rates of these actuators are all set as 57600.

  1. When I comment the Adafruit section in both void setup() and void loop(), my RC100 controller can control all actuators successfully via BT210 assembled on the OpenRB150;

  2. When I comment the Adafruit section in only the void loop(), it still works but the serial port displays nothing;

  3. When I keep the Adafruit section in both void setup() and void loop(), the actuators can not be controlled via BT210 but the serial port displays sensor data successfully;

It looks like something conflicts between the two, but not the serial port setup? What do you think about this?
First from now on, please put your code inside this “Preformatted Text” tool
image

It will be easier for everyone to read your code.

I copied your previous code and cleaned up the “if defined … else” stuff.
I did find a “misplaced” closing bracket that must have affected your RC100 code.

Also there were a bunch of weird hidden characters inside your code too. All that are cleaned up too.

Enclosed is a code that compiled fine on my PC so try it first and see.

//Adafruit section
#include <Wire.h>
#include <Adafruit_MPRLS.h>
#define RESET_PIN -1 // set to any GPIO pin # to hard-reset on begin()
#define EOC_PIN -1 // set to any GPIO pin to read end-of-conversion by pin
Adafruit_MPRLS mpr = Adafruit_MPRLS(RESET_PIN, EOC_PIN);

#include <RC100.h>
RC100 Controller;
uint16_t RcvData = 0;

#include <Dynamixel2Arduino.h>
#define DXL_SERIAL Serial1
#define DEBUG_SERIAL Serial
const int DXL_DIR_PIN = -1;
Dynamixel2Arduino dxl(DXL_SERIAL, DXL_DIR_PIN);
using namespace ControlTableItem;
const float DXL_PROTOCOL_VERSION = 2.0;

const uint8_t gr_ID = 1;
const uint8_t rt_ID = 2;
const uint8_t df_ID = 3;
const uint8_t fd_ID = 4;

double gr_CP, gr_DP, gr_initial, rt_CP, rt_DP, rt_initial, df_CP, df_DP, df_initial, fd_CP, fd_DP, fd_initial;

void setup(){

//Adafruit section
  Serial.begin(115200);  // Serial Monitor
  Serial.println("MPRLS Simple Test");
  if (! mpr.begin()) {
    Serial.println("Failed to communicate with MPRLS sensor, check wiring?");
    while (1) {
      delay(10);
    }
  }
  Serial.println("Found MPRLS sensor");

  Controller.begin(2);
// Set Port baudrate to 57600bps. This has to match with DYNAMIXEL baudrate.
  dxl.begin(57600);
  dxl.setPortProtocolVersion(DXL_PROTOCOL_VERSION);
// Get DYNAMIXEL information
  dxl.ping(gr_ID);
  dxl.ping(rt_ID);
  dxl.ping(df_ID);
  dxl.ping(fd_ID);
// Turn off torque when configuring items in EEPROM area, set PWM mode
  dxl.torqueOff(gr_ID);
  dxl.setOperatingMode(gr_ID, OP_EXTENDED_POSITION);
  dxl.torqueOn(gr_ID);
  dxl.writeControlTableItem(PROFILE_VELOCITY, gr_ID, 50);
  dxl.torqueOff(rt_ID);
  dxl.setOperatingMode(rt_ID, OP_POSITION);//limit rotation angle
  dxl.torqueOn(rt_ID);
  dxl.writeControlTableItem(PROFILE_VELOCITY, rt_ID, 50);
  dxl.torqueOff(df_ID);
  dxl.setOperatingMode(df_ID, OP_EXTENDED_POSITION);
  dxl.torqueOn(df_ID);
  dxl.writeControlTableItem(PROFILE_VELOCITY, df_ID, 50);
  dxl.torqueOff(fd_ID);
  dxl.setOperatingMode(fd_ID, OP_EXTENDED_POSITION);
  dxl.torqueOn(fd_ID);
  dxl.writeControlTableItem(PROFILE_VELOCITY, fd_ID, 50);
}  // end of setup()

void loop(){
// MPRLS section
  float pressure_hPa = mpr.readPressure();
  Serial.print("Pressure (hPa): "); Serial.println(pressure_hPa/10);
  delay(50);

  RcvData = 0;
  if (Controller.available()){
    RcvData = Controller.readData();
//  }  // this } was in the wrong place

    if(RcvData == (RC100_BTN_L)){
      gr_CP = dxl.getPresentPosition(gr_ID, UNIT_DEGREE);
      gr_DP = gr_CP + 5;
      dxl.setGoalPosition(gr_ID, gr_DP, UNIT_DEGREE);
    }
    else if(RcvData == (RC100_BTN_R)){
      gr_CP = dxl.getPresentPosition(gr_ID, UNIT_DEGREE);
      gr_DP = gr_CP - 5;
      dxl.setGoalPosition(gr_ID, gr_DP, UNIT_DEGREE);
    }

    if(RcvData == (RC100_BTN_1)){
      df_CP = dxl.getPresentPosition(df_ID, UNIT_DEGREE);
      df_DP = df_CP + 5;
      dxl.setGoalPosition(df_ID, df_DP, UNIT_DEGREE);
    }
    else if(RcvData == (RC100_BTN_3)){
      df_CP = dxl.getPresentPosition(df_ID, UNIT_DEGREE);
      df_DP = df_CP - 5;
      dxl.setGoalPosition(df_ID, df_DP, UNIT_DEGREE);
    }

  }   // end of if Controller.available()
}   // end of setup

Also the way you use L and R buttons and 1 and 3 buttons are “mutually exclusive” so you have to use if-else-if structures.