Using Portenta M4 Core with Dynamixel2Arduino Library

Ever since I got my Portenta H7, I had been working on getting the M4 Core to work with the Dynamixel2Arduino library and my various I2C and SPI sensors, and here is what I found:

  1. The Dynamixel2Arduino library does work on the M4 Core, but its performance is not reliable. I am including a modified “scan_dynamixel” sketch so that others can try out on their own. You will need to put a jumper cable between Pin D5 and pin D6 via the usual MKR DXL Shield headers.
/* Scan Dynamixel example modified to run on M4 core of Arduino Portenta H7 Lite 
*  Portenta Serial UART Application for sending Data from M4 to M7
*  
* ================================================================================
* IMPORTANT: Connect Serial_M4 pin D5 TX to Serial_M7 pin D6 RX 
* ================================================================================
* 
*/

//////////////////// Start All Core M7 Programming /////////////////////
#ifdef CORE_CM7 
UART Serial_M7(NC, PA_8, NC, NC);  // Pin D6 RX for M7 (Receive only)      

void setup() { 
   bootM4(); // get the M4 core running   
   Serial.begin(115200); // regular Serial Monitor
   Serial_M7.begin(115200);  
}

void loop() {
  if (Serial_M7.available()) {          // If anything comes into Serial_M7 
     Serial.write(Serial_M7.read());    // Read it and send it out over Serial Monitor
  }
}

#endif 
//////////////////// End All Core M7 Programming /////////////////////

//////////////////// Start All Core M4 Programming /////////////////////
#ifdef CORE_CM4 
UART Serial_M4(PC_6, NC, NC, NC);    // pin D5 TX for M4 (Send only)

#include <Dynamixel2Arduino.h>

#define DXL_SERIAL   Serial1
#define DEBUG_SERIAL Serial_M4
const int DXL_DIR_PIN = A6; // DYNAMIXEL Shield DIR PIN for MKR Shield used with Portenta H7 Lite
#define MAX_BAUD  5
const int32_t baud[MAX_BAUD] = {57600, 115200, 1000000, 2000000, 3000000};

Dynamixel2Arduino dxl(DXL_SERIAL, DXL_DIR_PIN);

//This namespace is required to use Control table item names
using namespace ControlTableItem;

void setup() {
  DEBUG_SERIAL.begin(115200); // matching with M7 
  delay(5000);
  
  // put your setup code here, to run once:
  int8_t index = 0;
  int8_t found_dynamixel = 0;
  
  for(int8_t protocol = 1; protocol < 3; protocol++) {
    // Set Port Protocol Version. This has to match with DYNAMIXEL protocol version.
    dxl.setPortProtocolVersion((float)protocol);
    DEBUG_SERIAL.print("SCAN PROTOCOL ");
    DEBUG_SERIAL.println(protocol);
     
    for(index = 0; index < MAX_BAUD; index++) {
      // Set Port baudrate.
      DEBUG_SERIAL.print("SCAN BAUDRATE ");
      DEBUG_SERIAL.println(baud[index]);
      dxl.begin(baud[index]);
      for(int id = 0; id < DXL_BROADCAST_ID; id++) {
        //iterate until all ID in each buadrate is scanned.
        if(dxl.ping(id)) {
          DEBUG_SERIAL.print("ID : ");
          DEBUG_SERIAL.print(id);
          DEBUG_SERIAL.print(", Model Number: ");
          DEBUG_SERIAL.println(dxl.getModelNumber(id));
          found_dynamixel++;
        }
      }
    }
  }
  
  DEBUG_SERIAL.print("Total ");
  DEBUG_SERIAL.print(found_dynamixel);
  DEBUG_SERIAL.println(" DYNAMIXEL(s) found!");
}

void loop() {
  // put your main code here, to run repeatedly:
}


#endif
//////////////////// End All Core M4 Programming /////////////////////

You can see that the original “scan_dynamixel.ino” sketch is virtually unchanged. The only issue was that the Serial Monitor is not available to the M4 core, so a “round-about” solution was created using the tightly coupled UART Ports Serial_M7 and Serial_M4 via Pins D5 and D6.
Well, did it work? Yes and No. Below is a screen capture of a good run

But sometimes, I would get bad runs

  1. My SPI Pixy2 camera could not be made to work on the M4 core.

  2. My I2C VL53L5CX ToF imager gave me 1 reading and got locked up.

So, it looks like that only the M7 core can be put into practical uses at present.

1 Like

UPDATE: 10/19/2022
I managed to test a Sync_Write/Read example to 4 XL-430s on a Portenta H7 Lite using single M4 or M7 and a split job between M4 and M7.

The Sync-Write/Read protocol used is the one described in this post:

The results were as follows:

  • Run on M7 alone - all Sync Write and Sync Read worked as supposed to. The DXLs responded as expected.

  • Run on M4 alone - The DXLs behaved as expected, but when looking at the printout: the Sync Read all gave erroneous print out, but interestingly enough NO PACKET ERROR is reported (see picture below).

TC_KF_Test1

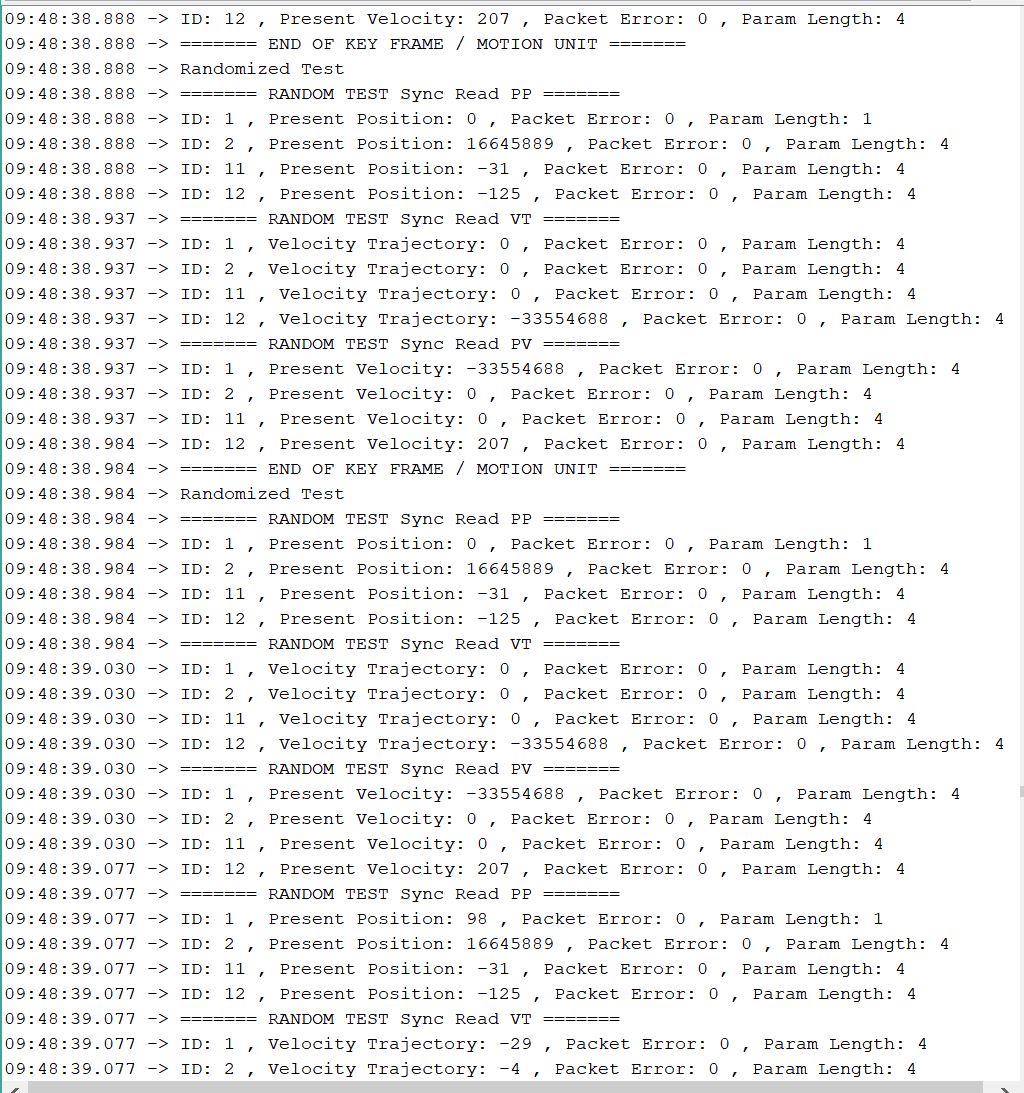
In short, Sync Write commands came though OK, but Sync Read results got scrambled somehow. @willson would probably understand better than me about what is going on here.

  • I split the job into two separate tasks: Sync Write only on M4 and Sync Read only on M7. Surprisingly - Sync Write worked as before, and Sync Read worked properly too, but that lasted only about 22 seconds into the test, and then M7 just hanged or crashed. Supposedly, the Portenta H7 allows multiprocessor access to its USART1/2/3. So once again @willson would probably understand better than me about what is going on here.

I know that the Dynamixel2Arduino Library has specific timings built-in to read return packets so may be this issue can be resolved one day ???

UPDATE: 10/20/2022
Today Arduino releases a new Portenta Core V. 3.4.1.
And I just tested my HuskyLens Camera (I2C) via M4, and it worked fine. :grinning:

I will test my Pixy2 and OpenMV-H7 camera in SPI mode in the next few days and will report back.

10/21/2022

Pixy2 still is not working on M4, but it is working on M7 OK as before.

@willson, Good News! SyncRead and SyncWrite work OK inside M4 Core now. BUT only if I use the “old deprecated” version of the SyncRead and SyncWrite packets as shown on the ROBOTIS e-manual - see this post

If I use the “new” “packed” version as shown in “sync_read_write_position.ino”, it will fail inside M4 Core, however this “packed” version works fine on M7 Core. So I hope that ROBOTIS will not REMOVE access to the “deprecated” version from the Dynamixel2Arduino Library in the future.

So far, I have been able to develop a complete RC solution for a CarBot using BT-210 + TASK Virtual RC100 Controller + XL-330s completely inside M4! Then with the HuskyLens camera now working in M4, I am now in good shape!

ARDUINO, Thank You! :grinning: